Return to part 1 – Cosy thermostat repair
Replacing the battery in a Cosy central heating thermostat – part 2
Health warning
Do not attempt this project unless you are competent, it involves soldering and other operations that can be hazardous. There are many places where this project can go wrong, do not attempt it unless you know what you are taking on. The author accepts no responsibility for any damage or injury caused by attempting a similar project.
Read this page for information about tools that you will need.
How to open a Cosy thermostat unit
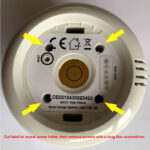
Remove the thermostat unit from the charging base and turn it over. The top cover of the thermostat is held on by 4 hidden screws. See the photo for the location of the screws, you need to cut the label on the base to reveal the screw holes. The screws are Philips head, you need a long thin screwdriver to reach them.
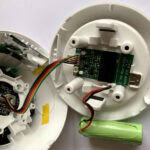
Carefully separate the two parts of the thermostat, taking care not to stretch the connecting cables inside.
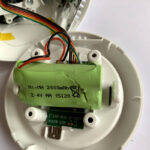
The rechargeable battery is held in place by a double-sided sticky foam pad, carefully separate the battery from the pad.
Remove the small plug that connects the battery to the circuit board in the base of the Cosy thermostat unit.
Battery removed from Cosy base but still connected by wires. Carefully remove the small plug.
The battery may or may not look exactly like the one shown here. If your battery is different you will need to modify the procedure accordingly.
After the battery is removed, carefully remove the outer shrink-wrap cover to reveal the ends of the individual battery cells. There may be insulating tape over the metal ends of the cells, remove it if it there so that the cells can be tested with a voltmeter.
Next page – part 3 – Testing the rechargeable battery cells and deciding what to do