Back to part 2 – opening the Cosy thermostat
Testing the Cosy thermostat battery cells
Health warning
Do not attempt this project unless you are competent, it involves soldering and other operations that can be hazardous. There are many places where this project can go wrong, do not attempt it unless you know what you are taking on. The author accepts no responsibility for any damage or injury caused by attempting a similar project.
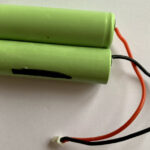
After removal of the outer shrink-wrap the battery pack will look like this, two NiMH cells connected in series, each cells gives around 1.25 volts, making a total of 2.5 volts. Use a voltmeter to test the individual cells to determine whether they are still showing any voltage. It’s always possible that the battery is not the problem with the Cosy thermostat.
The photos that follow show the test results for the two cells, then a replacement AA size battery.

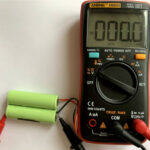

From the images you can see that one of the original cells has failed because it shows zero volts. The other original cell is still giving 1.33 volts.
The new cell is showing 1.34 volts.
Having established that one of the original cells has failed there is a decision to be made.
Should only the faulty cell be replaced or both?
The original cell that still holds a charge has been used for some time so it is sensible to replace it. Also, it is preferable to have two cells of the same type in case there are charging difficulties with mixed cells.
Soldering the wires to the replacement rechargeable cells for the Cosy thermostat
Cut the red and black wires from the old battery pack and prepare the ends for soldering to the new battery cells.
Cut a short length of a suitable wire to join the replacement cells in series. This will be about 15mm long, prepare the ends for soldering by removing a short length of insulation.
CAUTION: Be sure to solder the red wire to the +ve battery terminal and the black wire to the -ve terminal. If you get them the wrong way around the Cosy unit will probably be damaged.
For this project ordinary AA NiMH batteries were used because they were already available. If new batteries are being purchased then batteries with tags already spot welded to the ends can be purchased. NOTE: It is preferable to use cells that already have tags attached or purchase a battery pack similar to the original. These are readily available from electronics suppliers that can be found via internet search engines.
A good quality soldering iron of reasonable power will be required if soldering to the base of AA cells so that the end can be heated quickly. This is important to prevent overheating the inside of the cell. Practise on some old exhausted non-rechargeable batteries to make sure that your soldering skills are suitable for this job. Use a good quality flux and high quality solder.
The replacement battery pack

The replacement battery for the Cosy thermostat is shown here. Before adding a layer of shrink wrap to enclose the cells the battery was tested by plugging it into the Cosy thermostat.
Next page – Testing the replacement battery with the Cosy thermostat – part 4